May 2013

A Typical Day at Hack Reactor and the Math of Poker

Where does the time go? It’s hard to believe I’ve been in San Francisco for an entire month already. I am at a point where the Hack Reactor routine feels normal, and my overall work ethic has increased by a few notches.

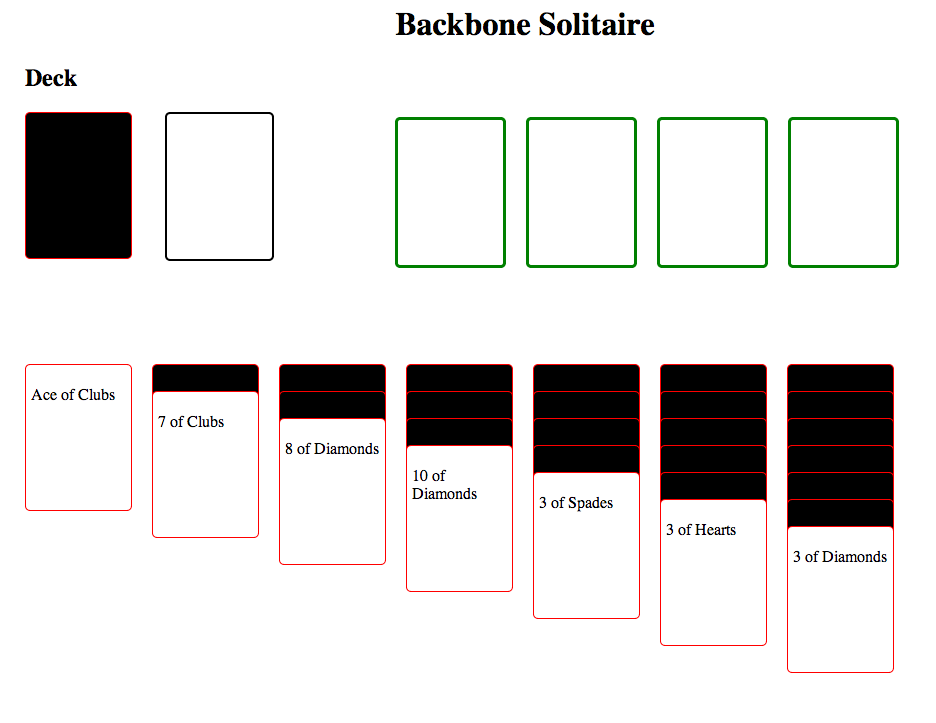
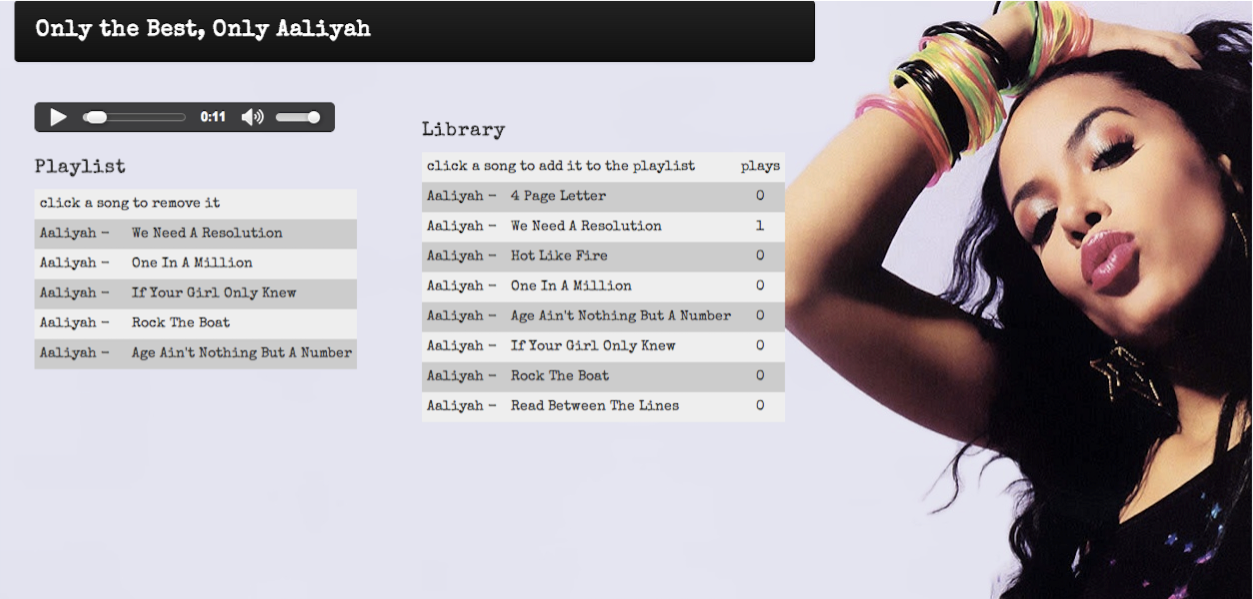
Any hint of laziness is immediately dismissed because there is just SO MUCH TO DO at all times. Just when you have an hour where you feel, “Hey, I think I’m getting comfortable with Backbone.js”, the instructors make you save your work, push it up to GitHub and move on to a completely new topic.

I have so many project ideas for cool apps I could build with all of this new-found knowledge, but no time to start any of them right now. I am hoping for some time off at the end of this course to pick a few of the best ideas and actually get them built as portfolio pieces.

I gave my student presentation this week, which had been weighing on me for the past few days. One student gives a 5 minute (most of the time longer) presentation each night after dinner. I had been debating on what to talk about for a couple week now, but ended up deciding on a talk about the math of poker.

I started my talk with the history of math in poker, and the explosion of new strategies and techniques in the last 10 years. I then gave an overview of Expected Value (EV), why it is one of the most important concepts to understand in any poker game, and how to calculate your EV for a sample situation while at the table.

the-math-of-poker-slide

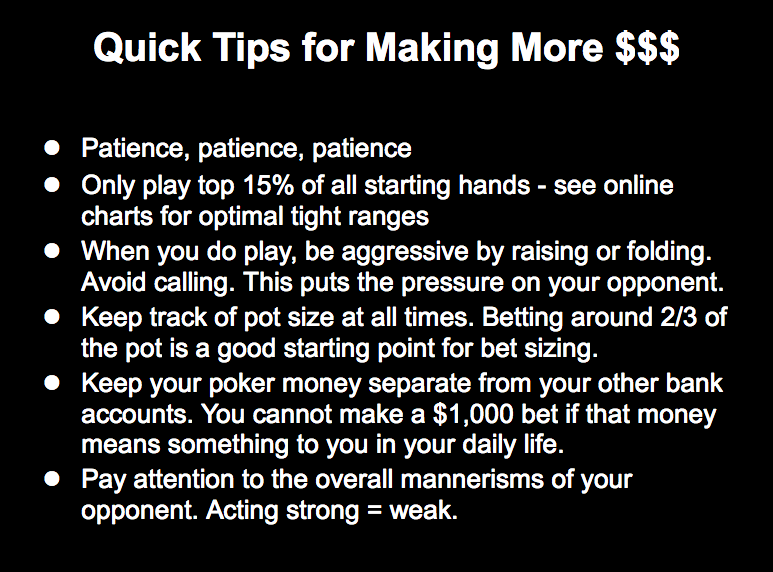
One of the slides from my presentation on the math of poker.

Due to the number of questions I received during my presentation, I ended up talking for about 30 minutes. However, the class seemed to be really enjoying talking about poker strategy. I had many conversations with individual students throughout the week about different poker topics, and it turned out to be a good conversation starter. I’m hoping to get a weekly poker game started, if only we had more free time…

A Typical Day at Hack Reactor
I have been talking about how busy we are at all times, but maybe you’re wondering what a typical day at Hack Reactor is like? Here is a rundown of what a recent day of learning Node.js included:

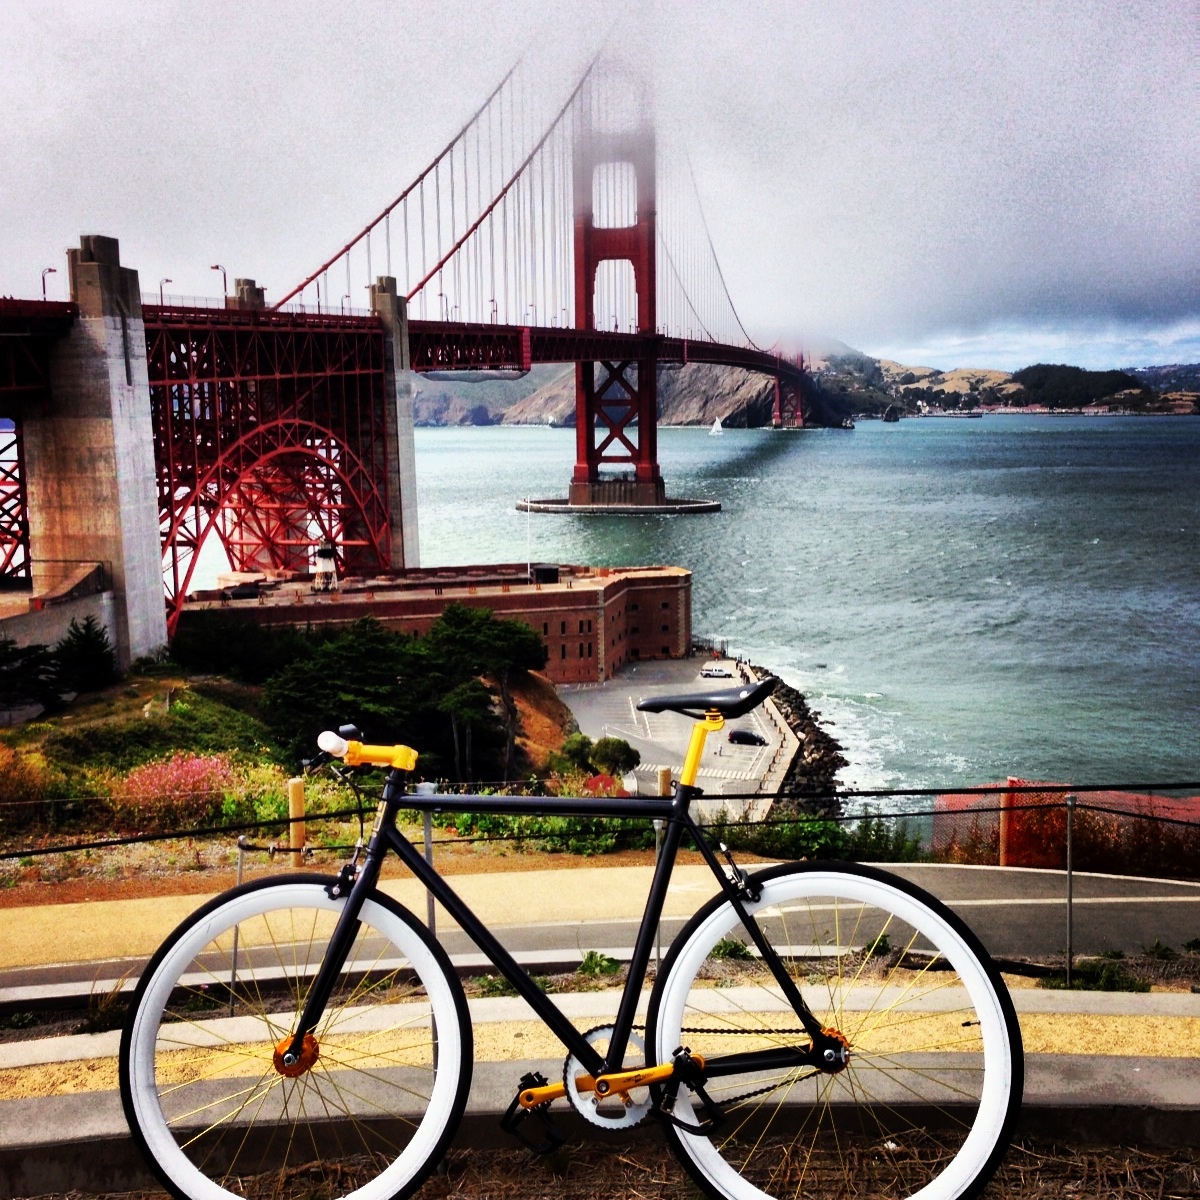
8:45am – Arrive at the Hack Reactor building on Market Street. Lock up my bike and take the elevator to the top floor.

9am  - I grab some of the free breakfast items. My usual is greek yogurt, mixed berries and granola.

9:15am – The gong signals it’s time to start the day. After announcements it’s time to go over the solution to yesterday’s Toy Problem. These are short, complex problems that are designed to prepare us for technical interview questions.

9:30am – Time to pull down the Toy Problem repo and begin working on today’s problem: Given an array of 99,999 unique numbers ranging from 1 to 100,00 in a random order, find the one number that is missing from the list.

10am – Submit a pull request with your final Toy Problem solution. My class then meets in the presentation corner to begin a lecture about the basics of Node.js, the basics of a web server, and how to use HTTP event listeners in Node.

11:30am – Lecture ends, and it’s time to break into pairs. I join up with my classmate Charles and we dive into the Node.js curriculum that was just posted to the Hack Reactor curriculum site. This part of the learning process is designed to throw you into using a framework or language with minimal guidance. The instructors want us to struggle and find answers on our own. The project for this sprint is to implement a Node.js server that can handle requests from the client-side chat application we built in our AJAX sprint last week.

12:30pm – Charles and I wrote some code early on in the hour, but we were headed down a wrong path, so we scrapped it and started again with a clearer goal in mind. We were just making some progress, but now it’s time to break for lunch.

1:30pm – After lunch, the junior class meets up for a more in-depth lecture about the specifics of Node.js. Now that we’ve actually written some Node server code on our own, the concepts begin to make much more sense.

2:30pm – 5:30pm – This is the main block of time to explore the Node documentation and we start making some real progress on our Node server.

5:30pm – Dinner break, and time to explore some dining options in SF.

6:30pm – Both Hack Reactor classes join up for tonight’s student presentation. One student gives a 5-10 minute presentation each night, about almost any topic they are an expert in.

6:45pm – 8pm – This block of time can vary from student code review sessions, to guest lectures by engineers from companies like Uber and Facebook. Tonight we had a Q&A session with some recent Hack Reactor alumni. It was incredibly interesting to hear about their job search and hiring experiences. Based on the jobs the panel of alumni had secured, I am extremely optimistic about my future prospects.

8pm – 10pm – Most of the students at Hack Reactor stick around after the 8pm dismissal time to work on the sprint from that day some more, or to hack on a personal project.

Pretty much this entire week was focused on server-side scripting and dealing with different database structures. Topics we covered this week include Node.js, SQL databases, no-SQL databases like MongoDB, and an ORM (Object-Relational-Mapper) called Sequelize. We also learned about a great Node de-bugging tool called node-inspector, which I highly recommend looking into if you haven’t used it yet.

Next week we are moving on to Ruby and gems like Sinatra.

Read more

A One-Day Sprint with Backbone.js – Backbone Solitaire

Today we took a break from the regularly scheduled sprints. The idea was to focus on a topic you wanted to spend more time with, and to come up with an app idea you could implement quickly. This was a good exercise in project management, along with testing how much of a skill you could put into an app on your own.

I decided to build a simple solitaire game using the Backbone.js MVC framework I talk about in my Hack Reactor Week 3 blog post, along with CoffeeScript. I already had working deck-shuffling code that I could use from the blackjack game we built, so I figured it wouldn’t take too long to translate that into a new card game. I was definitely mistaken about this.

I started the project with a whiteboard session to draw up the game layout and initial deal of all the cards. This would help break up the app into smaller chunks that could be translated in the different models and views. I then sketched out all of the individual modules and organized them into their Backbone components. I ended up creating the following models and collections: Card, Deck, Column, GameBoard, and Game. I also created corresponding views for each of these modules.

Backbone-Solitaire

Rough styling of my solitaire views. Only the column and deck models have live data at this time.


Building a Backbone app from scratch was the biggest challenge of my day today. Laying out all of these models, collections, and views, and then making sure they can all talk to each other took much longer than I anticipated. Backbone takes a pretty big commitment of code before you can start to see your data rendered to the screen. I also spend lots of time in the Chrome JavaScript console to make sure all of my model data was in the correct place for each object.

After spending too much time diving into the details of Backbone, CJ came over to my workstation to see how things were coming along. I didn’t have much on the screen at this point, so he advised me to focus on the most simple task I could and completely get that model and view completed as my first deliverable. I decided to focus on the initial deal of the 28 cards in the main game board. This required focusing further on each individual column, and building a column model to grab the corresponding cards from the deck collection. I made some good progress once I was focused on this particular module.

Before I knew it, everyone was leaving for dinner break and I had just moved on to building the view for the 24 remaining cards in the deck after the initial board setup. This is when I realized that the project was going to take me quite a bit more time to complete, and I had been too ambitious in my project planning from the start. I should have chosen a much simpler concept, rather than a card game with complicated logic and drag-and-drop functionality. I will definitely remember this lesson when it comes to planning future projects.

My main takeaways from today:

  • Focus on the most simple version of a project.
  • A first build of an app is best accomplished by removing all features
  • Focus on small deliverables so you always have working code to commit every few hours or every day

Today was the first time we had been released on our own, to create a project from scratch. I was pleased with what I learned about Backbone.js, but I need to be less ambitious with my one-day goals at this point in my career. Hopefully I can find some time to work on this project more in the future!

I pushed my initial code to GitHub if you want to check it out, but it is most definitely a work in progress.

Read more

Backbone and CoffeeScript: Hack Reactor Week 3 in Review

On my day off this week, I decided to bike the Golden Gate bridge over to Sausalito. The views were incredible:

biking-the-golden-gate-single-speed

Time is really flying by now, and the weeks at Hack Reactor are starting to blur together. Week 3 was primarily focused on MVC (model-view-controller) architecture, and how to use Backbone.js to organize your application. MVC is used to separate different parts of your code into logical modules, and then to define how those models can interact with one another.

When laying out your code, the model consists of all of your data, along with the functions and logic used to control and manipulate that data. The view consists of the code used to display the model data on the screen. The controller is what handles user inputs, and it relays those inputs back to the model.

Backbone.js is a JavaScript framework that is used for developing single-page web applications. It is based on some components of MVC architecture, but substitutes a presenter for the controller. In Backbone, the Model class usually represents a single instance of an object. These models are then organized into Collections, where further logic can be applied to the entire group. View classes are used to display the data from the models on the screen, and View can also be organized into View Collections.

Our first dive into using Backbone was to create a simple browser music player called MyTunes. Unfortunately (fortunately for some?) the only mp3′s we were provided were old Aaliyah songs. The parameters were to have a library view of all available songs, and a playlist for organizing and playing these songs. Each song had its own Backbone Model class, and songs were grouped together into Model Collections.

The song models had events attached to them, which would trigger specific behaviors like “play”, “enqueue” in a playlist, “end of song” and so on. Each one of these triggered events would change the model data, and our views would listen for these changes, then update the display and music player function accordingly.

Once we were satisfied with the behavior and styling of our music player, we ventured into experimenting with the Backbone Router class. This allows your single-page app to have unique URLs for specific user navigation points, and also to allow the use of browser navigation controls like the Back button. We decided to give each song it’s own unique URL, which allows you to navigate to a specific song very quickly. I’ll definitely be using the Router extensively in future projects.

backbone-js-music-player

Only the Best, Only Aaliyah – ummm yeah…

The next Backbone project was designed to explore this framework further with a more complicated project that required deeper nesting of models and views, and more event listeners. Our task was to design an in-browser blackjack game using Backbone and CoffeeScript. We were all just starting to get familiar with the basics of Backbone, and now we had to write all of our code using this new language called CoffeScript that compiles down to JavaScript. The pace of learning is relentless at Hack Reactor!

My first hour with CoffeeScript was filled with a lot of “why are we using this” and “I will never use this again in the future”. CoffeScript is just JavaScript, but with a much more concise syntax that resembles something like Ruby or Python. There seems to be lots of controversy surrounding CoffeScript online. Some developers won’t use it, while others are strongly in favor of it, and this is a good example of the main points from both sides of the debate.

After two solid days of using CoffeScript, where do I stand? I have to say that I warmed up to it and after about 3-4 hours of working with the compiler, I began to prefer writing using its “syntactical sugar”. In fact, during our end of week assessment, I found myself writing in CoffeeScript by accident in a section where it wasn’t required!

Here is a sample of some CoffeeScript, and what the identical, compiled JavaScript looks like:

//This is the CoffeScript, just 5 lines!
if hasAce
      newScore = [score, score + 10]
      if @isDealer and @models[0].attributes.value == 1 then return [score]
      if newScore[1] > 21 then [score] else [score += 10]
    else [score]

//This is the compiled JS at 14 lines, with lots of brackets
var newScore;
if (hasAce) {
  newScore = [score, score + 10];
  if (this.isDealer && this.models[0].attributes.value === 1) {
    return [score];
  }
  if (newScore[1] > 21) {
    [score];
  } else {
    [score += 10];
  }
} else {
  [score];
}

How to get your computer set up to write in CoffeeScript
Interested in trying CoffeScript? I would suggest playing around with the Try CoffeScript tab on the .org website.

Once you have spent a few minutes there, go ahead and install CoffeScript on your machine. Step two is to get your text editor set up for CoffeScript syntax highlighting. Then, you can start compiling the .coffee files into .js files that your browser can read. You need to simply run this line of code from your terminal to start the compiler and continually update the compiled .js files as you edit your code:
coffee --output compiled --map --watch --compile .

My blackjack project is still a work in progress, but the basic functionality is all completed. The biggest challenge was to handle aces (1 or 11 depending on the situation), along with handling a dealer natural blackjack on the first two cards without revealing the dealer’s down card. My next steps are to implement more advanced features like splitting and re-splitting, doubling down, along with jQuery animations and styling.

We wrapped up the week with an intro to Node.js, which I will go into in further detail next week. We then took a Hack Reactor field trip to play laser tag out in Concord, which was a great way to end the week.

Read more

Hack Reactor Student Blogs

I have gathered up a selection of Hack Reactor student blogs and personal websites. You may be curious as to what past students have experienced, or what other students have built with their newly acquired web engineer skills. Enjoy browsing!

April 2013 Cohort:
Jake Seip: http://seip.io/
Evan Peelle: http://fullstackgrowthhacker.blogspot.com
Alex Gaputin: http://googamanga.tumblr.com/
Eric Levin: http://ericrius1.tumblr.com/
Dylan O’Carroll: http://banjolina-jolie.tumblr.com
Brian Chu: http://www.brianchu.com/
Bianca Gandolfo: http://bgando.tumblr.com
Elle Beal: http://ellebeal.tumblr.com
Patrick Stapleton: http://blog.gdi2290.com
Charles Holbrow: http://charlesholbrow.com
Eric Levin: http://ericrius1.tumblr.com
Combiz Salehomoum: http://combizs.tumblr.com

March 2013 Cohort
Andrew Magliozzi: http://pleasestealthisidea.com/
Selby Walker: http://selbywalker.com/
Blake Embrey: http://blakeembrey.com/
Mark Lee: http://markleeis.me/
Nima Mehanian: http://tumblr.mehanian.com/

January 2013 Cohort
Mark Wilbur: http://logicmason.com/
Mike Adams: http://mikeincode.com/
Coleman Foley: http://learningtocode.quora.com/
Howard Tang: http://howardtang.co.uk/
John Katsnelson: http://greenbunnybearrug.wordpress.com/
Tony Thomson: http://www.tonythomson.com/blog/
Gavin McDermott: http://gvnm.tumblr.com/
Andreas Nauleau: http://anauleau.tumblr.com/

November 2012 Cohort
CJ Winslow: http://youcanlearn.it/
Christen Thomson: http://whitepinedev.com/
Henry Zhu: http://henrycode.tumblr.com/

Let me know if you know of any others to add to the list!

Read more

N-Queens, Algorithms, REST, and Ajax – Hack Reactor Week 2

inside Hack Reactor

Inside Hack Reactor


Week 2 at Hack Reactor has come to a close, but the frantic pace of learning continues. We kicked off week 2 by finishing up our Sub-Class and OOP sprint that involved making individual nodes “dance” on the page with any random behaviors we decided to give them. What we ended up with were fancy screen savers with objects that could interact with each other (and explode!). This led us to a discussion of particle systems, which sounds like something I want to devote some time to once this course is over.

We had another guest lecture at the beginning of the week regarding algorithms, complexity analysis, and ways to approach solving interview problems. Solving complex problems like this while under pressure is a skill I need to work on, but luckily there are a few great online resources to help build your skills. Some of my favorites that I’ve used so far are:
Project Euler
Coderbyte
TopCoder Algorithm Tutorials

Our discussion of algorithms led us into our next project, and my favorite project of the week, called N-Queens. This goal of this project is to find how many ways n queen chess pieces can fit on an nxn chessboard without being able to attack each other. So, if you have a 4×4 chessboard, how many different ways can you fit 4 queen chess pieces on the board so that all 4 queens are safe from being attacked by the other queens? The answer for the 4×4 board is 2 different arrangements of queens. For a more in-depth explanation, check out the wikipedia entryfor the 8 queens solution.

Currently, the largest board that all solutions have been found for is a 26×26 board. At this time, 27×27 is too large of a solution to be handled by today’s computer processors with the current algorithms. However, some students in the senior Hack Reactor class are tackling this problem with an app called supercomputer.js that leverages many networked computers, each solving a small portion of the entire algorithm (similar to the Playstation 3 Folding@Home project out of Stanford).

We spent much of the first day building a JavaScript algorithm for finding single solutions to this problem, and testing it on small chess boards (less than 8×8). We ran through a series of tests written in Jasmine to ultimately come to an algorithm that would successfully find every solution for a given n. However, our first attempt was a brute-force solutions that used 2-dimensional arrays to build every possible configuration of n queens on the board. We then tested every one of these board layouts to determine if it was a valid arrangement where the queens couldn’t attack one another. The boards that passed our test were put into a results array, and then counted. This solutions was very inefficient and took a tremendous amount of computer processing power to complete. This first attempt could not find a solution to any n over 7, because the browser would time out before the JavaScript was done running.

Now that our algorithm was finding all of the correct solutions, it was time to optimize it so that we could find solutions to chess boards above 8×8. Our first optimization involved making our tests for evaluating correct boards more efficient. With these improvements, we were able to find all 92 solutions to n=8 in just over 20 seconds on a Mac mini. From there, we decided to trim down the number of chess boards our algorithm generated.

Instead of creating a large tree data structure of all possible solutions, we started checking early on in the board building process if the piece we just placed was in conflict. So, once we placed a queen on the first row, we knew no other queens could be placed on that row, thus moving on to second row right away. We also knew that the first queen placed on the second row cannot be placed in the same column as the piece on the first row, thus “pruning” our data tree of all possible iterations below that conflicting node. We also checked for diagonal conflicts before placing each piece. The result of this “pruning” was allowing our algorithm to find all solutions on an 8×8 board in about 2.5 seconds!

We were pretty excited about our 10x improvement in speed, but we decided to see if we could make it even faster. Up until this point we represented our solutions using 2-dimensional arrays, which take a lot of iterations to traverse all of the elements. We decided to represent our boards using a simple 1-dimensional array instead. For example, a 3×3 array normally looks like [[1,0,0],[0,1,0],[0,0,1], with the 1 representing a queen (not an actual solution obviously). Instead, we can represent this same array with [0,1,2] , with each index of the array representing a row, and the value of that index representing where in that row the queen is located. Once we implemented this new storage mechanism, our time for finding the n=8 solution was reduced to 49 milliseconds! It was very satisfying to see such huge speed gains from each improvement we made in our code. Here is our final JavaScript solution:

window.countNQueensSolutions = function(n){
  var startTime = new Date();
  if (n===0){return 1;} //0 queens fit on a 0x0 board 1 time
  var solutionCount = 0;
  var rNQueens = function(tempBoard){
    if(tempBoard.length === n){
      checkQueenSolution(tempBoard) && solutionCount++;
      return;
    }
    for(var i = 0; i < n; i++){
      var boardCheck = tempBoard.concat(i);
      if (checkQueenSolution(boardCheck)){
        rNQueens(boardCheck);
      } else {
        continue;
      }
    }
  };
  rNQueens([]);
  var endTime = new Date();
  console.log('Number of solutions for ' + n + ' queens:', solutionCount, 'in', endTime - startTime, 'milliseconds');
  return solutionCount;
};

window.checkRookSolution = function(matrix) {
  return _.uniq(matrix).length !== matrix.length ? false : true;
};

window.checkQueenSolution = function(matrix) {
  if(!checkRookSolution(matrix)){
    return false;
  }
  for(var i = 0; i < matrix.length; i++){
    for(var j = i+1; j < matrix.length; j++){
      if(i - j === matrix[i] - matrix[j] || i - j === -matrix[i] + matrix[j]){
        return false;
      }
    }
  }
  return true;
};

The remainder of week 2 was spent learning about HTTP requests, REST, and how to use Ajax with the service from Parse. We lumped this all together to create a real-time chat room client that all of the Hack Reactor students could use. Once everyone was up and running with the chat client, we implemented features like preventing script attack hacks, creating friends lists, and allowing the user to create and join new chat rooms.

This week was intense, but the instructors are warning us about the start of week 3, which involves us diving into Backbone.js. I’m running through some Codeschool tutorials on Backbone right now to get prepared for next week!

Read more

Hack Reactor Week 1 in Review

Week number one at Hack Reactor is over, I had my first day off since moving to SF, and we’re back at it for week 2. The pace this first week was crazy, and I can’t believe how much material we covered in such a short amount of time. I found myself getting home most nights about 11pm this week, simply because there was so much material to digest and work out in my code.

I also finally got my bike shipped out to me, which has been so much better than taking public transportation everywhere. My ride to school in the morning is about 5 miles, and I have been able to find a route that has as few hills as possible because it’s a single speed bike. Getting some exercise in the morning really gets me brain working correctly for the day, and I’ve been much more alert since starting that routine.

new-loki-cycles-bike

After re-building our pre-course assignments, we dove head first into quite a few basic computer science lessons and how to implement them in JavaScript. We also had a guest talk from a former senior team lead  at Facebook, and I attended my first JavaScript meetup. Here is a run-down of the major topics we covered in just the first 6 days:

  • Git workflow and command line
  • JavaScript basics like functions, methods, callbacks, closures, objects and scope
  • Recursion and as an example we re-built the getElementByClassName native JS function
  • The debugger command and the process of finding errors with Chrome dev tools and the console
  • JavaScript prototype chains
  • jQuery basics – used to make a simple Twitter clone
  • JavaScript classes and shared methods with functional, functional shared, prototypal, and pseudoclassical instantiation
  • Test Driven Development with Jasmine and Mocha
  • Object Oriented Programming: isolation, modularity, loose coupling, makers, mixins, subclassing, etc.
  • JavaScript event systems
  • Data Structures: hash tables, linked lists, trees, binary trees, sets, and big O notation

Wow, that is a ton of material now that I have it all together in one place. We implemented all of these bullet points in different sprints and projects this first week. I just hope I can retain it all in the weeks to come.

We also got to see the personal project presentations of all the students in the senior class, which is 6 weeks ahead of us in the Hack Reactor course work. Some of the web apps that were presented were very impressive, and I can’t wait to start applying some of my new knowledge to a project of my own. There seemed to be a few students that tried to tackle a project that was too ambitious for the time they had to work on it, and as a result we had to sit through presentations of projects with limited or incomplete functionality. I talked with a few of the senior students and they stressed the importance of limiting the scope of your project to start, then adding more features as time permits. Seems like a good engineering code to live by, in general.

Some resources I came across this week:
Coderbyte – small JavaScript problems with timers and scoring to practice your skills. A lot of fun and a good boost when you some a problem quickly.
HTML5 Conference Slide Decks – One of the presenters at the meetup this week, Dan Lynch, has his deck here, but it looks like tons of interesting content. I want to check it out when I have more time.
Fancy.js – A mashup of underscore.js and functional.js. Love the poker-themed demo.

Read more

Online Learning with Code School and Treehouse

In preparation for my time at Hack Reactor, I spent about 2 months learning on my own through various channels, both online and off.  I began with some basic books covering the fundamentals of HTML, CSS, JavaScript, web design fundamentals, and web standards. Most of these books, despite their best efforts, were fairly uninspiring. I ended up referring to them only when I need to quickly reference a particular topic. Even then, I was able to find a better solution that was more specific to the topic at hand on websites like Stack Overflow. I knew I was missing out on some key curriculum around each of these subjects, and I went looking online for a better way to learn.

After an hour of research, I decided to sign up for a couple of video-based coding websites called Treehouse and Code School. I tried some sample videos on each site and decided they both had quite a bit to offer in terms of boosting my current skill set. However, despite being in the same vertical of online web development training, each site has its own strengths, and I decide to sign up for both. What follows is my experience on each site.

treehouse-logo31

Treehouse
I started learning with Treehouse first because their site is geared towards absolute beginners that would like to learn how to build websites from scratch. I was already designing simple sites on my own, but I felt like starting at the beginning would help me to fill in some knowledge gaps surrounding the fundamentals.

The Treehouse approach is to present you with a series of short video lectures on a particular detailed topic (like CSS selectors). Between each, or every few videos there is a short quiz or a short interactive coding challenge to test your skills. There are also complete web projects, like designing a responsive website, that walk you through building the site while holding your hand along the way. With these project videos, it helps to write code while the video is playing on another screen.

Treehouse also has a few different ways to move through the curriculum. You can select a broad topic like Javascript Foundations, or you can join one of the many Learning Adventures like how to Become a Web Designer. These Leaning Adventures are roadmaps through the curriculum that group together all of the broader topics and puts them in a logical learning order. I chose to go through the Become a Web Developer Learning Adventure and was very pleased with the pace and the depth of videos on each topic.

Treehouse has a huge library of videos on many different topics, from front-end aesthetic design, to Ruby on Rails, to iOS development, to how to start a business.

code_school

Code School
I started learning at Code School after I had spent about a month on Treehouse. Their curriculum is more geared towards people with some prior web design experience that are looking to learn a new language or expand their knowledge of a more advanced topic. Code School is also the resource Hack Reactor recommended as a good way to prepare for their fast-paced software engineering curriculum.

Code School has courses on topics not covered at Treehouse like Git, jQuery, Coffee Script, Backbone.js, and Node.js. Their most extensive video library is a thorough introduction to Ruby and Rails, with 9 separate modules currently. The first course I tried was called Git Real, and it was the best learning tool I had found online regarding what Git does and how to use it. I have run through 3 other Git tutorials online, and Git Real was by far the most clear and easiest to learn of all of these options.

My next modules covered the basics of JavaScript and jQuery. These modules did a great job preparing me for both the Hack Reactor prep work and the projects we have completed thus far.

Code School features very in-depth video lessons and extensive interactive challenges that put your newly learned knowledge to the test. Each video is about 5-10 minutes in length, and once the video is complete you attempt to solve the presented problems as their software checks your progress each step of the way.

Comparison & Tips
I can honestly say I would sign up for both of these online schools again, and I have current subscriptions at both sites. If you are new to web development and looking to learn the basic fundamentals of CSS, HTML, and aesthetics, I would recommend Treehouse to start with. If you are already comfortable with building simple websites and looking to learn JavaScript (and JS frameworks) or Ruby, Code School is the best place to start.

Personally I preferred the Code School course layout of short videos with in-depth, interactive challenges directly following. The Code School interactive programming environment is superior to the similar tool on Treehouse, and Code School uses it to “get your hands dirty” after every single video. You need be more accountable to yourself when working through the Treehouse videos because their tests and challenges aren’t as demanding.

On Treehouse, I preferred their Learning Adventures to the way Code School presents its courses. Treehouse also has a larger quantity of videos to choose from, which is why they have different ways to go through them all. I also like the interactive projects on Treehouse that leave you with a completed website by the time you are done with all of the videos.

For both sites, I found it helpful to keep a notebook with extensive notes and examples on each topic. I am constantly referring to these notes, even 2 months after writing them. Writing something down seems to cement the knowledge in my brain, but it does add quite a bit of time to going through the videos. I was having to pause the videos a lot to make notes and write down examples. It’s a lot of work, but you will be glad you have those notes in the future.

Conclusion
We live in an amazing time where so much knowledge is so readily available on the internet. These video training websites are extremely inexpensive for the depth of knowledge they contain. For about $25 a month you can expand your skillset to include entire libraries of things you did not know last month. Combined with learning at your own pace in your own house, they are far superior to basic web design classes taught at traditional universities. I wanted to take what I learned on these sites to the next level of becoming a full-fledged web engineer, which led me to sign up for Hack Reactor.

Both Code School and Treehouse are adding new videos and lessons to their libraries every week, and I encourage you to try a sample video at each, and sign up for both! You can never go wrong with learning some new skills.

Links
Code School
Treehouse
Code Academy – free, without videos

Read more